You’ve spent weekends hammering together your perfect backyard deck. But then those visible screw heads pop up everywhere, killing the clean look you wanted. Or worse, they start backing out after a season, leaving you with splinters and headaches.
Hidden fastener systems fix that. They use clips or tracks that grip deck boards from below, so no screws show on top. Traditional deck screws, on the other hand, go right through the face of the boards; they’re the standard choice you drive in with a drill.
You face a real choice for your next project. This post breaks down how to install both options step by step. We’ll cover the pros and cons too, so you pick what fits your time, budget, and style.
Hidden systems deliver that sleek finish and less hassle down the road, while screws get you done fast and cheap right away. First, let’s look at the basics of each method.
Why Choose Hidden Fastener Systems for a Clean, Modern Deck
Hidden fasteners keep deck boards secure from below or between them. You see no metal on the top surface. These metal clips or grooves hold everything tight without drilling through the face.
They offer real perks over visible screws. First, you get a smooth, seamless look that shines during backyard parties. Guests walk barefoot without snagging toes on heads. Second, boards split less because no holes weaken the surface. Third, airflow increases under the deck. That cuts moisture buildup and rot over time. Finally, replacement stays simple. Pop out one board, slide in a new one, done.
Most systems work great with composite, PVC, or wood decks. Side-mount clips grab board edges. Face-mount versions sit on joists. Track systems run full lengths for big jobs. Because of these options, your entertaining space looks pro-built. No one guesses it’s DIY. However, they cost more upfront. Still, the long-term wins make it worth it.
Types of Hidden Fasteners and When to Use Each
You have a few main types to pick from. Each fits different spots on your deck. Start with camo-edge clips. They lock into board edges. Use them for borders or tight fits. Pros include low cost and easy install on 5/4-inch boards. They shine for wood decks on a budget.
Next, consider I-Joist clips. These sit between boards. They fasten from the sides into joists. Pick them for wide-open areas. They handle composite boards up to 6 inches well. Plus, they boost stability without gaps.
Biscuit fasteners slide into grooves you cut. They join board ends or middles. Go for these on PVC decks needing expansion room. They cost a bit more but prevent cupping.
Other options include side-mount clips for quick edge work and face-mount for heavy loads. Track systems suit long runs because they spread weight even.
Here’s a quick pick guide:
- Wood deck, low budget: Camo-edge or side-mount clips. Save cash, still clean.
- Composite, mid-range: I-Joist or biscuit. Match board widths perfectly.
- PVC or premium: Full tracks. Best airflow, easy fixes later.
Match your choice to material and cash. Test a sample first. That way, no surprises.
Tools and Prep You Need Before Starting
Prep sets you up for success. Straight joists mean flat decks. Check them with a level first. Tape joists too. It blocks water and rust.
Gather these essentials before you dive in. A good kit speeds things up.
Here’s your simple checklist:
- Hidden fastener clips: Match your type and board size.
- Special screws or staples: Short ones for clips only.
- Drill with bits: Use square-drive or star bits for grip.
- Spacers: 1/8-inch for even gaps between boards.
- Level and tape measure: Keep lines true.
- Joist tape: Self-adhesive for protection.
- Chalk line: Snap straight board guides.
- Safety gear: Gloves, glasses, ear plugs.
Lay out tools nearby. Straighten crooked joists with shims. Then dry-fit boards. Gaps stay uniform. As a result, your deck looks sharp from day one. Skip this, and fixes eat your weekend.
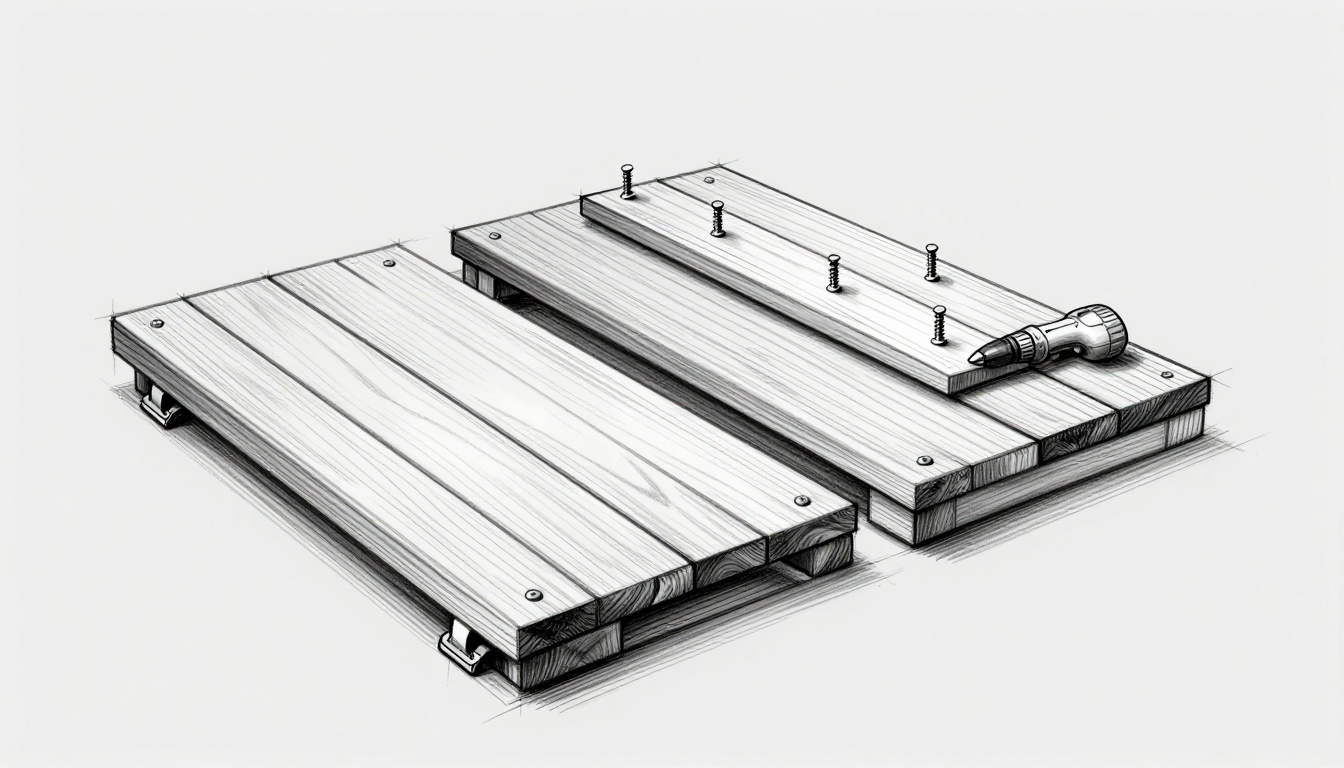
How to Install Traditional Deck Screws Like a Pro
Traditional deck screws offer a straightforward way to secure your boards. You drive them right through the top face into the joists below. They cost less than hidden systems, grip strong, and feel familiar if you have built before. However, those visible heads stand out. They can rust over time or cause boards to cup if you skip prep. Pre-drill holes to stop splitting, especially in hardwoods. Coated screws work for most jobs; stainless steel fights corrosion better in wet areas. Pick them for budget wood decks where speed matters more than a flawless top.
Start simple, and you avoid headaches. Follow these steps, and your deck holds up for years.
Step-by-Step Screwing Guide for Beginners
Good prep makes all the difference. Mark everything first. Then drill and drive. You finish faster with fewer fixes.
Here is the process:
- Mark joist locations. Snap chalk lines across joists every 16 inches. This keeps boards straight. Use a tape measure for precision.
- Pre-drill pilot holes. Choose a bit slightly smaller than your screw shank. Drill at a 90-degree angle or slight angle toward the joist end. This prevents splits in cedar or pressure-treated pine.
- Space boards 1/8 inch apart. Use spacers or nails between edges. Even gaps let water drain and wood expand.
- Drive screws two per joist crossing. Pick 2.5- to 3-inch deck screws. Use two per board at each joist. Drive straight or at a 15-degree angle for extra pull-down force. Countersink heads slightly if you plan plugs later.
- Check level often. Run a long level across boards after every few rows. Adjust as needed before screws set.
Don’t over-tighten; it crushes wood fibers and weakens holds. Common mistakes hurt too. A wrong angle misses the joist center, so the board wobbles. Skip pre-drilling, and cracks appear fast. Fix by practicing on scrap first.
Pro Tips to Make Screws Last Longer
Choose the right screw for your wood. Cedar pairs well with coated screws because they resist tannin stains. Pressure-treated lumber needs stainless steel; coatings wear off quicker there. In salty coastal spots, always go stainless.
Seal holes after driving. Dab exterior caulk or wood filler in each one. It blocks water that causes rot. For a cleaner look, tap in matching wood plugs. Sand them flush.
Inspect yearly. Look for loose heads or rust. Tighten or replace as you spot issues. Clean debris from gaps too. That keeps moisture low.
Coated screws save money upfront. They handle rain fine for 5-10 years. Stainless costs more but lasts 20+ years without pitting. Test both on small projects. Your deck stays solid longer.
Head-to-Head: Hidden Systems vs. Deck Screws Compared
You want the facts straight. Hidden systems and deck screws both build solid decks. However, they differ in ways that affect your daily use and wallet. Let’s stack them up side by side. First, check this quick comparison table. It highlights key differences based on real-world installs.
| Factor | Hidden Systems | Deck Screws |
|---|---|---|
| Appearance | Seamless top surface, no visible marks | Heads or plugs show; plugs fade over time |
| Install Time | Slower start (1.5 days/200 sq ft), faster repairs | Quicker first build (1 day/200 sq ft) |
| Durability | Both hold 200+ lbs per point; hidden needs less tweaking | Strong hold, but screws loosen with weather |
| Cost | $1-2 per clip upfront; saves long-term | $0.10 per screw; cheaper now, more fixes later |
| Maintenance | Rare checks; no re-driving | Tighten loose ones yearly |
| Skill Level | Moderate; needs precise spacing | Easiest for beginners |
Pros use hidden systems because they cut callbacks by 50 percent. Screws work fine for simple jobs. Now, break it down further.
Appearance, Strength, and Upkeep Breakdown
Hidden systems win on looks. You get a clean deck top with no screw heads or plugs. Those plugs on screw decks yellow or pop out after rain. Barefoot walks stay smooth.
Strength matches up well. Each hidden clip grips over 200 pounds, just like quality screws. Tests show both resist pull-out in wind or heavy furniture. So, safety stays equal.
Upkeep favors hidden options. Loose screws mean re-drilling and driving. That eats weekends. Hidden clips stay put because they flex with wood movement. As a result, you inspect less often.
Cost and Time: Real Numbers for Your Budget
Costs hit different. Deck screws run about $0.10 each. For a 200-square-foot deck, you buy 500 screws for under $50. Hidden clips cost $1 to $2 apiece. That same deck needs 250 clips, so expect $250 to $500 more upfront.
Time varies too. Screws let you finish 200 square feet in one day. You drill, drive, done. Hidden installs take 1.5 days at first. Clips demand even gaps and joist tweaks. However, fixes speed up later. Swap a warped board in minutes, not hours.
Warranties tip the scale. Many hidden brands offer 25 years because clips reduce stress. Screw makers give 10 to 15 years typically. In short, hidden pays off over time. Pick screws if cash stays tight now. Go hidden for low-hassle years ahead.
Decide and Install: Matching Fasteners to Your Deck Project
You know the options now. Hidden fasteners or deck screws? Match them to your setup for best results. Start by sizing up your project. Then pick smart. Budget tight? Go screws. Want premium looks? Choose hidden. Composite decks pair best with hidden systems because they handle expansion well. Hybrids work too. Use screws for joists, hidden clips for boards on top.
Ask key questions first. They guide your buy. Answer them, and you avoid wrong picks.
Questions to Ask Before You Buy
Think through these factors. They shape your choice.
- Deck size? Small patios under 100 square feet suit screws. You finish fast. Big decks over 300 square feet favor hidden. Clips spread load even.
- Material? Wood like cedar takes screws easy. Composites or PVC need hidden clips. Screws split those boards.
- Skill level? New to decks? Screws build confidence quick. Pros pick hidden for clean lines.
- Climate? Wet or salty areas demand stainless screws or rust-proof clips. Dry spots let coated versions shine.
- Future plans? Resale soon? Hidden boosts curb appeal. Kids playing? Both hold strong, but hidden cuts splinters.
Use this quick yes/no flow:
- Tight budget or beginner? Yes to screws. No? Check next.
- Premium look needed? Yes to hidden. No? Screws win.
- Composite material? Yes to hidden. No? Either fits.
- Hybrid okay? Mix them. Screws below, clips above.
Test a small area first. Follow maker guides exactly. Wear safety gear always. So, your deck lasts. Ready to build? Grab tools and start.
Conclusion
Hidden fasteners deliver that clean deck top you crave, with less splitting and easy board swaps later. Traditional deck screws save time and money upfront, so they suit quick builds on a budget. Both hold strong, but hidden systems cut maintenance headaches over years.
Weigh your priorities now. If beauty and barefoot comfort matter most, upgrade to hidden clips. You build confidence with the steps we covered, no matter your pick.
Share your deck story in the comments below. Which method did you choose, and why? Check our posts on deck materials next for more tips. Your perfect backyard awaits.